How to fix CLOCK WATCHDOG TIMEOUT Windows 10 error
 A blue screen CLOCK WATCHDOG TIMEOUT error may occur in a Windows system when the specified processor does not process interrupts. This usually happens when the processor is not responding or is blocked. This error occurs when the processor has problems with the interaction of its cores and threads. Threads are tasks performed by the kernels, and some kernels can have many threads at the same time. The problem is that one thread is waiting for an adequate response from another thread, or one core is waiting for a response from another core, and these answers do not come. From a technical point of view, when the processor cannot continue processing tasks, because its resources are busy and interdependent for the release, this state is called Deadlock. So let’s try the options that will help correct this error.
The error may be 0x00000101. This indicates that the expected clock interrupt on the secondary processor in a multiprocessor system was not received in the allocated interval. In Windows 10, it sounds like this:
Your PC ran into a problem that it couldn’t handle,and now it needs to restart.You can search for the online : CLOCK_WATCHDOG_TIMEOUT .
How To Fix CLOCK WATCHDOG TIMEOUT Windows 10 error
Before doing this, you should make sure:
- If you have a restore point, you should try to roll back the system back to working condition.
- If you have overclocked your system, then return the default settings.
- All the steps below you should be done in safe mode with network support.
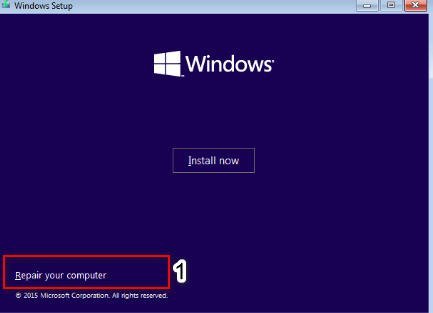
If you can not get into safe mode through Windows, then create an installation flash drive Windows 10, start the installation and click on the bottom of the “Repair your computer” Then you will be transferred to the advanced boot options, where you can go to the “Troubleshooting”> “Advanced options”> “Boot options”> “Reload” parameters and press F4 to start the safe mode.
Related post : Fix ntdll.dll crash error in Windows 10
1. Roll back recently updated device driver to fix CLOCK WATCHDOG TIMEOUT error
If you recently updated any driver, I suggest you roll back the driver and see if it helps roll.
2. Run the Windows Memory Diagnostic Tool
Run a memory check on your computer. Click Win + R and enter mdsched.exe. Follow the instructions on the screen. The system will automatically try to fix RAM errors if they are detected.
3. Disable new hardware
If you have connected any new device (USB flash drive, SSD, video card), then it is recommended to remove all such devices one by one and check whether this fixes your problems. This error can be caused if the newly installed device supports the processor using various instructions, such as installing a faulty driver and others. If you find a particular device that is causing the error, you can simply check if the latest driver is installed for it and is compatible with your operating system.
4. Troubleshooting clean boot state
You can fix the problem manually by doing a clean boot. Netboot runs the system with minimal drivers and startup programs. When you start your computer in clean boot mode, the computer starts using a pre-selected minimum set of drivers and startup programs, and since the computer starts with a minimum set of drivers, some programs may not work as expected. Clean boot troubleshooting is intended to identify performance issues.
5. BIOS update
The BIOS is a sensitive part of the computer. This is a software component on which the functioning of the hardware depends. Therefore, you must be very careful when changing anything in the BIOS. I would recommend that you skip this method if you do not know what you are doing, or do not know how to do it. You can rely on the instructions in which I described in great detail how I updated my UEFI (Bios).
See also : How to backup the Windows registry

